이 문서는 Selenium 을 이용한 웹 테스트 자동화 방법을 정리한다.
개요
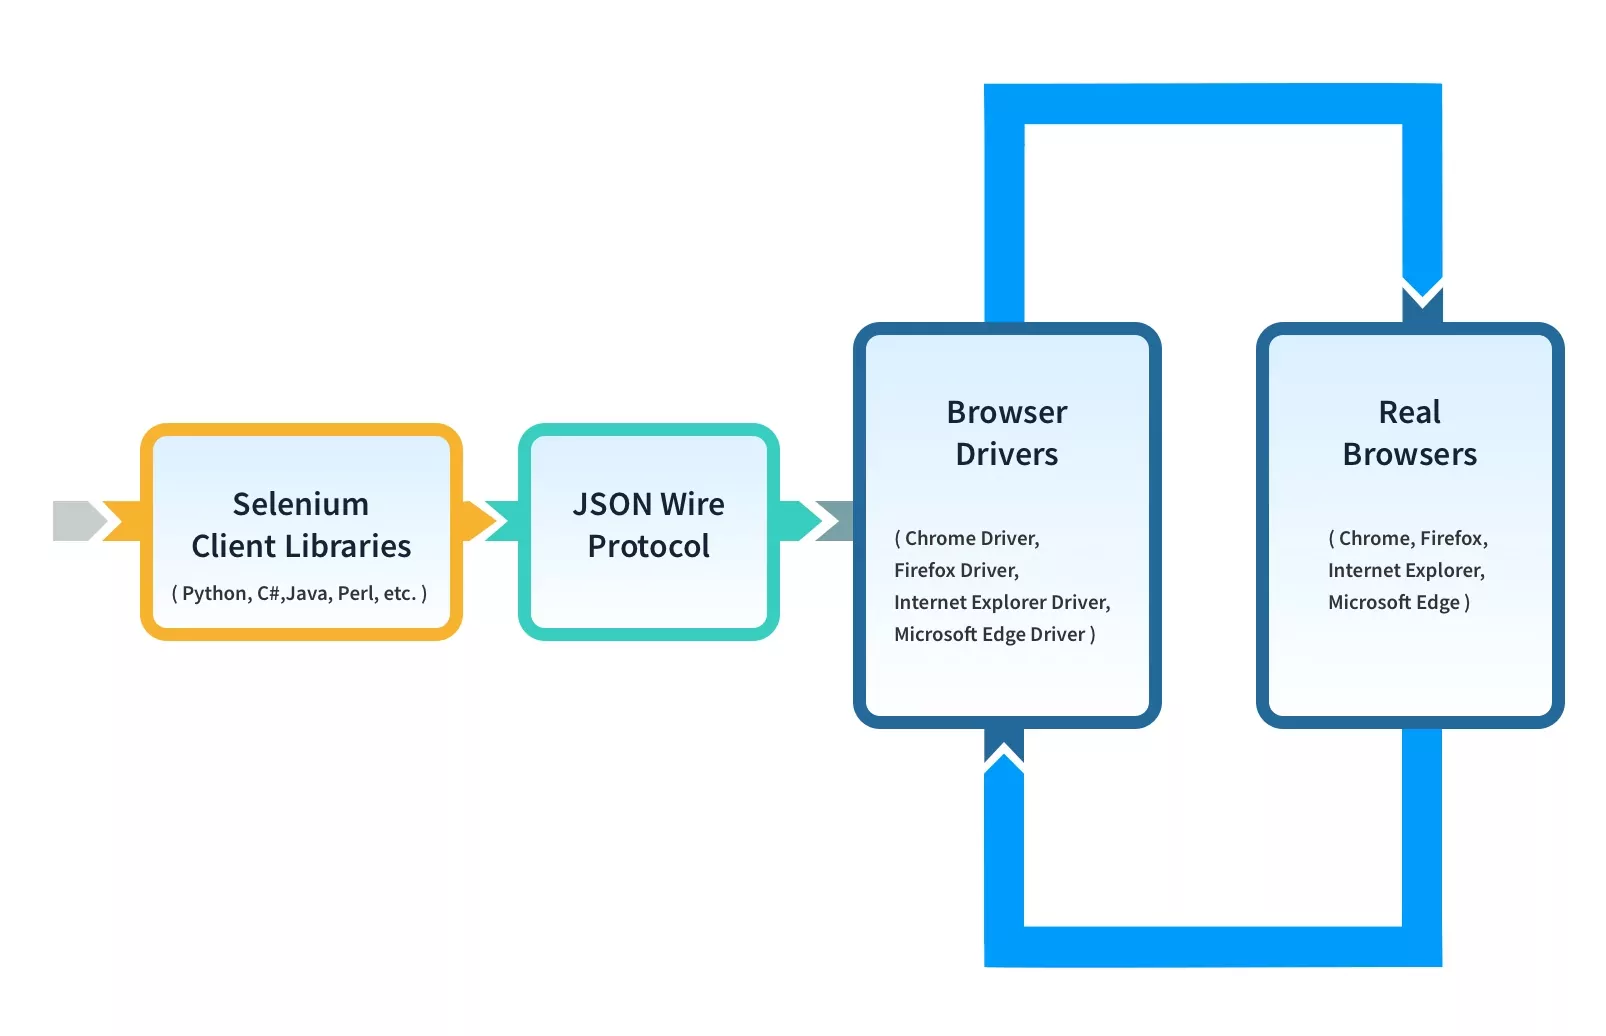
Selenium은 웹 브라우저를 자동화하기 위한 강력하고 널리 사용되는 오픈 소스 프레임워크입니다. 웹 페이지와 상호 작용하기 위한 테스트 스크립트를 작성하고, 사용자 작업을 시뮬레이션하며, 다양한 브라우저와 플랫폼에서 웹 애플리케이션의 동작을 검증할 수 있는 도구와 라이브러리를 제공한다. Selenium은 Java, C#, Python, Ruby, JavaScript를 포함한 다양한 프로그래밍 언어를 지원하여 웹 애플리케이션 테스팅에 있어 다재다능한 선택지를 제공한다.
제공 기능
다양한 언어 지원: Selenium은 Java, C#, Python, Ruby, JavaScript 등 여러 프로그래밍 언어를 지원하여 다양한 개발 환경에서의 사용을 가능하게 한다.
크로스 브라우저 테스팅: Selenium WebDriver를 통해 Chrome, Firefox, Internet Explorer, Safari 등 다양한 웹 브라우저에서 웹 애플리케이션을 자동으로 테스트할 수 있다.
웹 애플리케이션 자동화: 사용자의 웹 브라우징 활동을 모방하여 웹 페이지와의 상호 작용을 자동화할 수 있습니다. 이는 폼 제출, 마우스 클릭, 데이터 입력 및 추출 등을 포함한다.
Selenium IDE: 브라우저 확장 프로그램으로 제공되며, 코드 작성 없이 테스트 케이스를 기록하고 재생할 수 있는 기능을 제공합니다. 이를 통해 비개발자도 쉽게 테스트 스크립트를 생성할 수 있다.
Selenium Grid: 여러 시스템과 브라우저에서 동시에 테스트를 실행할 수 있게 해주어, 대규모 테스트 실행과 분산 테스팅이 가능합니다. 이는 테스트의 실행 시간을 단축시키고 효율성을 높여 준다.
오픈 소스: Selenium은 오픈 소스 소프트웨어로, 무료로 사용할 수 있으며, 활발한 커뮤니티의 지원을 받아 지속적으로 개선되고 있다.
Selenium 테스트 자동화 구성 요소
Selenium은 여러 컴포넌트로 구성됩니다:
- Selenium WebDriver: 직접 브라우저 자동화와 상호 작용을 허용하는 핵심 컴포넌트입니다. 브라우저에 명령을 보내고 결과를 검색하여 웹 애플리케이션의 자동화를 가능하게 한다.
- Selenium IDE (Integrated Development Environment): 코드 작성 없이 상호 작용을 녹화 및 재생할 수 있는 Chrome과 Firefox 확장 프로그램으로, 테스트 스크립트를 빠르게 생성하는 데 유용하다.
- Selenium Grid: 다양한 머신과 브라우저에서 동시에 Selenium 테스트를 실행할 수 있게 하여 분산 테스트 실행을 가능하게 한다.
Java Language 예시
사전 준비 사항
- Java Development Kit (JDK): 시스템에 JDK가 설치되어 있는지 확인하세요. 공식 Oracle 웹사이트 또는 다른 JDK 제공업체에서 다운로드할 수 있다.
- Integrated Development Environment (IDE): Eclipse, IntelliJ IDEA, NetBeans와 같은 IDE입니다. 이 가이드는 Eclipse를 사용한다고 가정한다.
- Maven: 프로젝트의 빌드와 의존성을 관리하는 프로젝트 관리 도구입니다. Eclipse와 IntelliJ IDEA에 통합되어 있다.
- WebDriver: 테스트하고자 하는 브라우저용 WebDriver 실행 파일을 다운로드해야 한다(예: Google Chrome용 ChromeDriver, Firefox용 geckodriver).
Selenium 테스트 프로젝트 생성 단계
Maven 프로젝트 생성:
- Eclipse를 열고
파일>새로 만들기>Maven 프로젝트를 선택한다. - 새 Maven 프로젝트를 생성하기 위한 마법사를 따릅니다. 기본 아키타입을 사용할 수 있다.
- Eclipse를 열고
Selenium 의존성 추가:
pom.xml파일을 편집하여 Selenium 의존성을 포함시킵니다.<dependencies>섹션 내에 다음을 추가한다:
LATEST_VERSION을 사용하고자 하는 최신 Selenium 버전으로 교체한다.<dependency> <groupId>org.seleniumhq.selenium</groupId> <artifactId>selenium-java</artifactId> <version>LATEST_VERSION</version> </dependency>
- 스트 클래스 작성: Java를 사용하여 웹 페이지를 열고, 제목을 검증하는 간단한 테스트 케이스를 작성합니다.
import org.openqa.selenium.WebDriver;
import org.openqa.selenium.remote.DesiredCapabilities;
import org.openqa.selenium.remote.RemoteWebDriver;
import org.junit.Assert;
import org.junit.After;
import org.junit.Before;
import org.junit.Test;

import java.net.URL;

public class GridTitleTest {

    private WebDriver driver;

    @Before
    public void setUp() throws Exception {
        // 원하는 브라우저 구성을 설정합니다.
        DesiredCapabilities capabilities = DesiredCapabilities.chrome(); // 여기에서 chrome을 다른 브라우저로 변경할 수 있습니다.

        // Selenium Grid Hub URL을 설정합니다. 이 URL은 Selenium Grid Hub에 대한 실제 URL로 변경해야 합니다.
        URL hubUrl = new URL("http://localhost:4444/wd/hub");

        // 원격 WebDriver 인스턴스를 생성합니다.
        driver = new RemoteWebDriver(hubUrl, capabilities);
    }

    @Test
    public void testWebTitle() {
        // 테스트할 웹 페이지를 엽니다.
        driver.get("http://www.example.com");

        // 페이지 제목을 가져와서 검증합니다.
        String pageTitle = driver.getTitle();
        Assert.assertEquals("Title of this web page", pageTitle);
    }

    @After
    public void tearDown() {
        // 테스트 후에 브라우저를 닫습니다.
        if (driver != null) {
            driver.quit();
        }
    }
}
코드 설명
설정(Setup):
setUp메서드에서는 원격 WebDriver 인스턴스를 생성합니다. 이때, Selenium Grid Hub의 URL과 원하는 브라우저 구성(예: Chrome)을 지정한다.테스트 실행(Test):
testWebTitle메서드에서는 웹 페이지를 열고, 그 제목이 "Title of this web page"와 일치하는지 검증한다.정리(Teardown):
tearDown메서드에서는 테스트가 완료된 후 브라우저를 닫는다.
- WebDriver 설정: 테스트 코드에서 시스템 속성을 설정하여 다운로드한 WebDriver 실행 파일의 경로를 지정한다.
- 테스트 실행: Eclipse에서 작성한 테스트를 실행하고, 웹 페이지가 예상대로 동작하는지 확인한다.
UI 요소 찾는 방법
Selenium은 다양한 방식으로 UI 구성 요소를 접근하는 방법을 제공한다.
- Id
- Links
- Tag names
- CSS Selectors
- XPath
- JQuery
- Text
예시)
driver.findElement(By.id(<elementID>))
driver.findElement(By.linkText(<linktext>))
Id
driver.findElement(By.id(“name of id”))
- UI 요소를 찾는 가장 이상적인 솔루션
- ID가 존재하지 않을 수 있음
- 복수의 Id가 존재 할 수 있음
Links
driver.findElement(By.linkText(“name of link”))
driver.findElement(By.partialLinkText(“name of link”))
- 링크에 표시된 텍스트로 요소 찾기
Tag
driver.findElement(By.tagName(“name of HTML tag”))
- 태그 이름 HTML 태그를 기반으로 웹 요소 찾기
CSS Selectors
Absolute path:
	driver.findElement(By.cssSelector(“html>body>div>p>input”))
Relative path:
	driver.findElement(By.cssSelector(“input”)) *first instance found
Regula attribut:
	driver.findElement(By.cssSelector(“button[name=‘button name’]”))
Special attributes:
	id: driver.findElement(By.cssSelector(“#save"));
	tag & id: driver.findElement(By.cssSelector(“button#save"));
	class attribute: driver.findElement(By.cssSelector(“.yoyo"));
	tag & class attribute: river.findElement(By.cssSelector(“input.username"));
	tag with attribute value: driver.findElement(By.cssSelector(“img[alt=„kuku‟]"));
	tag which has attribute: driver.findElement(By.cssSelector(“img[alt]"));
	tag which doesn‟t have attribute: driver.findElement(By.cssSelector(“img:not([alt])"));
XPath
/html/body/div[5]/div[2]/div/div[2]/div[2]/h2[1]
.//*[@id='answers']/h2[1]/a[1]
- XPath는 XML에서 노드를 찾는 데 사용되는 방법임
- 찾으려는 요소에 적합한 ID 또는 이름 속성이 없는 경우에 적합
- 절대 XPath 보다 상대 XPath 사용 권장
- XPath-Attributes는 ID나 이름을 사용할 수 없을 때 사용 권장
Syntax:
  htmltag[@attribute1=‘value1’ and @attribute2=‘value2’]

Example:
  input@id=‘Password’ and @placeholder=‘Password’]
WebDriver API 목록
driver. get("http://www.google.com"); To open an application
driver.findElement(By.id("passwd-id")); Finding Element using Id
driver.findElement(By.name("passwd")); Finding Element using Name
driver.findElement(By. Xpath("//input[@id=’passwd-id’]")); Finding Element using Xpath
element.sendKeys("some text"); To type some data
lement. clear(); clear the contents of a text field or text area
driver.findElement(By. Xpath("//select")); Selecting the value
findElement(By.id("submit")).click(); To click on Any button/Link
driver.switchTo().window("window Name"); Moving from one window to another window
driver.switchTo().frame("frame Name"); swing from frame to frame (or into iframes)
driver.get("http://www.google.com"); To open an application
driver.switchTo().frame("frameName.0.child"); to access sub frames by separating the path with a dot, and you can specify the frame by its index too
driver.switchTo().alert(); Handling Alerts
river.Navigate().to("http://www.example.com"); To Navigate Particular URL
driver.Navigate().forward(); To Navigate Forward
river.Navigate().back(); To Navigate Backward
driver.close(); Closes the current window
driver.Quit(); Quits the driver and closes every associated window
driver.switch_to_alert(); Switches focus to an alert on the page.
driver.Refresh(); Refreshes the current page
driver.get_screenshot_as_file('/Screenshots/foo.png'); The full path you wish to save your screenshot to
driver.get_screenshot_as_base64(); Gets the screenshot of the current window as a base64 encoded string
select.findElements(By.tagName("option")); Selecting the value
select.deselectAll(); This will deselect all OPTIONs from the first SELECT on the page
select.selectByVisibleText("Edam"); select the OPTION with the displayed text of “Edam”